Build an Arduino Pistol-grip Transmitter for RC Cars with 1KM Range!
3D print and build an Arduino Pistol-grip Transmitter for controlling Remote Control cars.
Today, we’re assembling and wiring a 3D printed Arduino-based pistol-grip radio transmitter that operates entirely based on Arduino-compatible electronics and is intended for anyone looking to control cars, boats, or any other vehicle that requires bidirectional drive and steering control.
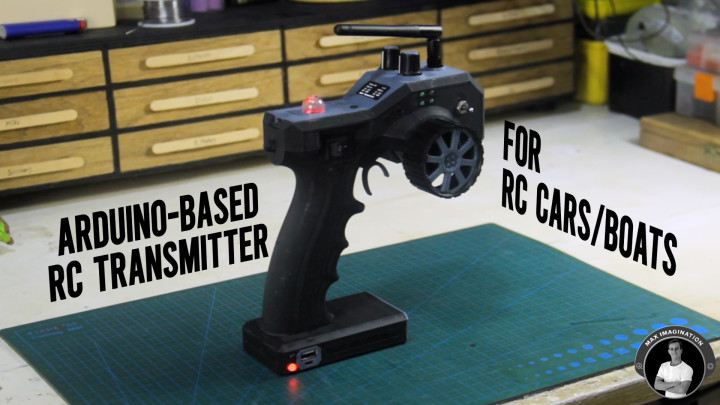
This DIY transmitter has 8 channels of control inputs, 1KM of operating range, around 48 hours of battery life, has a comfortable feel and grip while being straightforward to build and use for intermediate level makers looking to get into the RC hobby with Arduino parts.
With its high-power NRF24L01 radio transceiver module, the transmitter pairs up to an Arduino-based receiver containing 8 channels - 4 pins with PWM (0-255) for motors and servos and 4 pins with digital (HIGH/LOW) control for lights, horn, and other peripherals.
Parts and Materials for Transmitter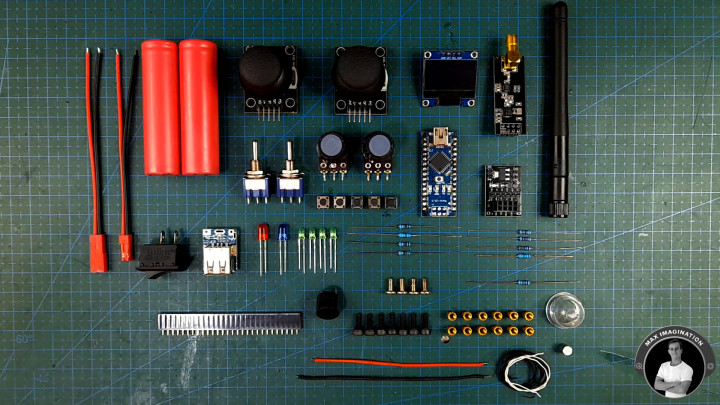
3D Printing Supplies and Equipment:
Download the Project Resource Files:
https://drive.google.com/drive/folders/1LM2x4gF254C3RxLSz5IIrHGuNWugVfy5?usp=sharing
1. 3D Printing Parts
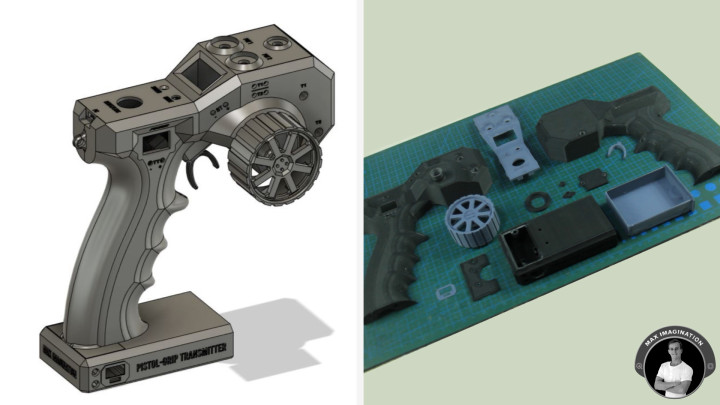
Initially, I started with a prototype breadboard circuit to test each functionality of the upcoming transmitter with roughly connected components I planned to use all of which I then 3D modeled one by one into the CAD software known as Fusion 360.
Each exact part dimension allowed me to accurately design the top cover, the grip inspired by a Desert Eagle pistol, and from there - the rest of the transmitter while shelling the halves, designing moving parts and fittings for every single component which leads us to the final 3D design of the grip-style transmitter you see printed out in the layed out parts seen above.
You can purchase the 3D model here - https://cults3d.com/en/3d-model/game/arduino-grip-style-transmitter-for-rc-cars-and-boats-8ch-radio-controller
You may find print settings and more details about printing the parts on that page.
With all parts printed out, we need to remove any support material using either a knife, pick, or through the warm water method which leaves us with both transmitter halves, stand pieces, button, and securing pieces in black while having the wheel, trigger, port cover, drawer, and top cover in Dark-gray filament.
We can additionally tape up and paint certain parts for color contrast like the steering wheel to make it look as if it has a tire.
2. Installing Threaded Inserts
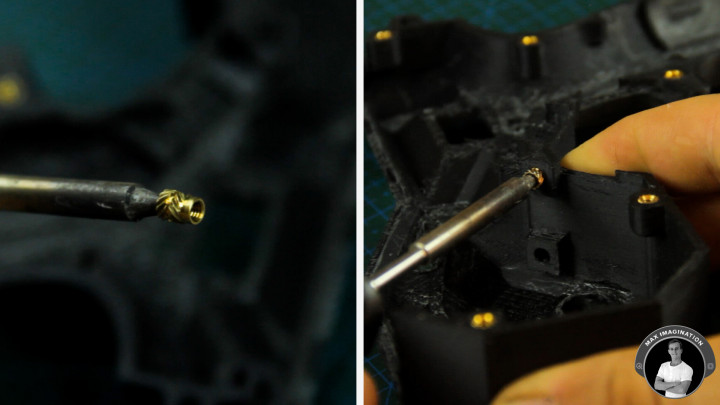
For securing parts together, we'll melt in these brass M3 threaded inserts with a soldering iron into the 4-millimeter holes.
We will need to install 18 of these distributed into the left and right shells, stand piece, and wheel.
We might even need to sand down brass inserts that get placed in shallow holes like the two that are being melted into as seen in the image.
3. Installing Wheel Assembly And Joysticks
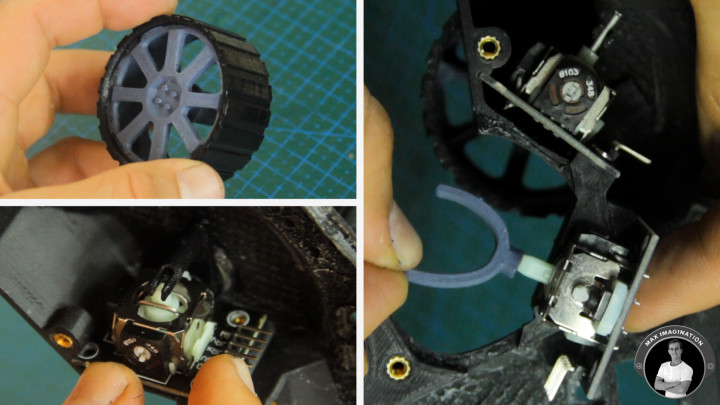
Moving onto the steering wheel assembly, the rotary joint between the wheel and right shell can be sanded, have super glue added to contact points, and be worn in for smoother rotation.
Pieces under tension like the steering link can be strengthened with superglue to avoid being broken. We can then secure the steering link piece to the wheel through the right shell using a longer M3 bolt.
The first components which we'll install are the joystick modules.
We need to first trim off enough of the steering joystick stick for it to fit into the steering assembly and then melt in a piece of steel bicycle spoke with 10mm protruding out to give the necessary control stick to connect with the steering link. We can then secure this Joystick with M3 screws followed by installing the throttle joystick in the corresponding cavity with its control stick trimmed as well. It too, is only bolted with two M3 bolts to the right shell and none attaching it to the opposite shell.
One mistake you can avoid here is securing joysticks with bolts directly to the PCB as this can potentially cut into tracks and cause a short circuit. This however, can be prevented using plastic washers.
4. Installing Components Into Shells
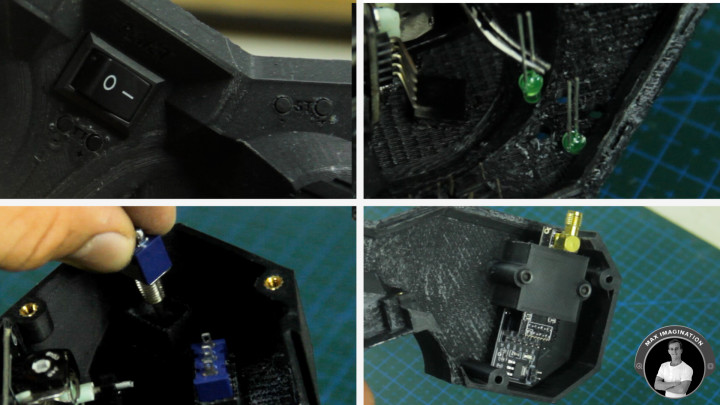
Next, we can continue installing other components into the shells such as the toggle switches followed by the trimming push buttons which need to be secured with super glue carefully at the edges to avoid seizing their movement. They should protrude enough so you can press them.
The next component we'll install is the 2-pin (SPST) rocker-style power switch followed by the 3mm green LEDs for toggle switch status indication with their cathode pins facing one another.
We can then secure the power-amplified NRF24L01 radio transceiver with its 3D printed plastic holder and 2 bolts.
5. Circuit Diagram - Arduino Pistol-grip Transmitter
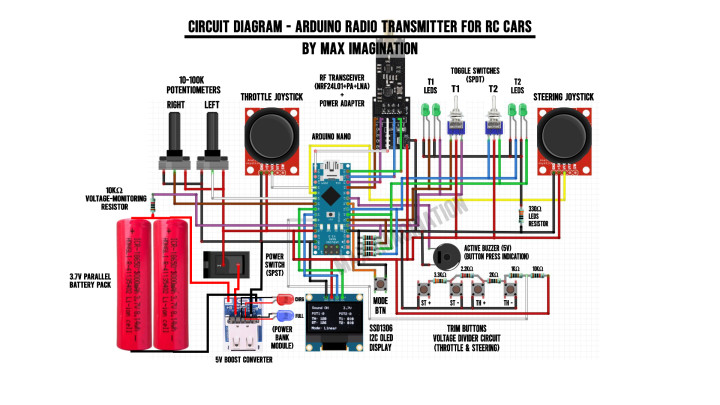
The transmitter’s connections from a glance will seem complicated, however, this wiring diagram takes the confusion away and gives you a good reference to look back at as you’re wiring your transmitter.
You can download the diagram included in the resources folder linked at the top of this blog.
To ensure connections are on-point, following along to the tutorial using the circuit diagram is crucial in succeeding with this Arduino-based transmitter.
As we move forward with this guide in working on connecting components and modules, let’s pay close attention to the wiring with every following step in the transmitter’s circuit assembly, especially looking closely at the resistive analog push button circuit.
6. Assembling The Stand
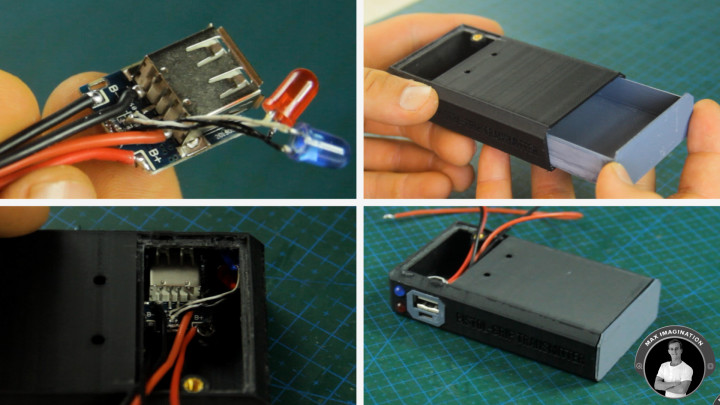
Moving onto the stand, let's configure this 5V boost converter (power bank module) with an extended and replacement pair of LEDs to indicate the battery's charging status.
Each of the 5mm LEDs replace the SMD LEDs which are desoldered off the board prior to soldering the new charging indicator LEDs connected through 30-gauge wire.
We’ll then solder 24-gauge wires directly to the outer USB port pins for 5V power output and a female connector at the B+ and B- terminals for the battery input. This power module gets secured with just one screw to prevent wriggling inside the stand/base while its LEDs are super glued into the holes beside it.
For the drawer-stand assembly, we can slot in a couple of 5mm neodymium magnets with attracting poles facing one another in the corresponding pockets (one in either part) to keep the drawer from sliding out of the base by itself.
For the aesthetics of it, we'll superglue a 3D printed cover piece around the power output and input charging ports.
7. Connecting Switches and LEDs
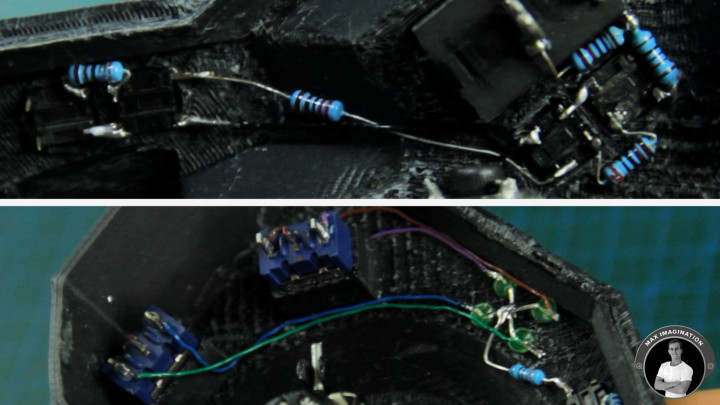
Now, we'll begin soldering resistors (10K, 3.3K, 2.2K, 2K, and 1K Ohms) between the trimming pushbuttons to form a resistive, voltage-divider analog input for the Arduino to tell which button is being pressed - analogous to a potentiometer with different activation thresholds set in the code. This helps minimize the number of pins used up from the board.
Once this resistive trimming button circuit is made, we can solder an analog output wire to the top right node and daisy-chain all ground connections across components such as the joystick modules followed by a ground connection for the 4 LEDs wired through a 330-Ohm current-limiting resistor.
From here, we can wire the LEDs to each corresponding outer toggle pin for switch status indication followed by a common (5V) power connection connecting the middle pins and wires from each switch going toward where the Arduino will sit.
8. Soldering Wires and Connectors
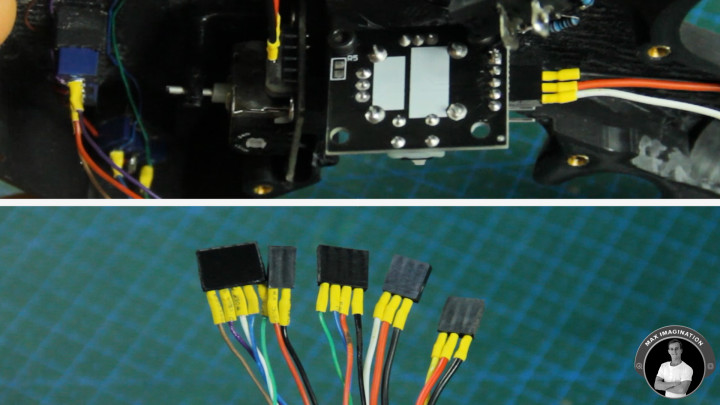
With all the components installed into the shells, we can begin preparing wired connectors to connect components with remaining pin headers.
Let's take a female pin header row and cut connectors sized for the radio module power and SPI communication lines, joysticks’ power and analog X-axis pins, and for the display’s power and I2C communication lines to which we'll solder corresponding colored wires.
Every single wired connection seen in the images can be matched by color according to the wiring diagram linked with all the other resource files.
9. Connecting Power and Grounds
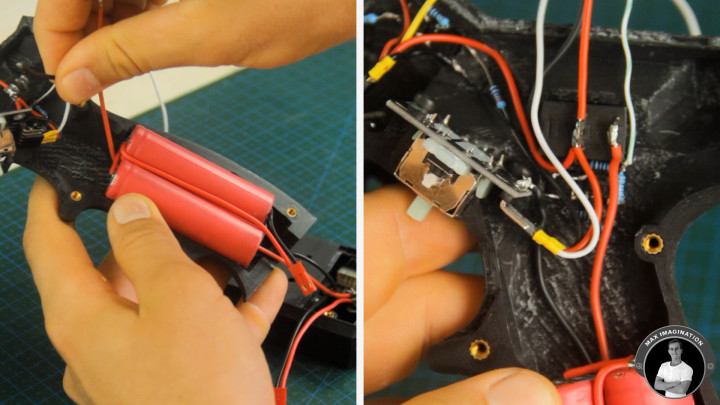
Next up, for power, let's wire a 6000mAh 3.7-volt parallel battery pack together using two 18650 lithium-ion cells which you can extract either from laptop batteries or purchase via one of the links at the parts list.
We'll continue by securing the battery to the shell with hot glue followed by having underlying wires coming from the power module in the base wired up to the switch and the circuit’s common ground (GND).
Additionally, we'll solder a wire to the battery’s “+” terminal for voltage monitoring.
Let's also ensure each remaining component has its 5V power connections hooked up to the circuit.
10. Wire Management
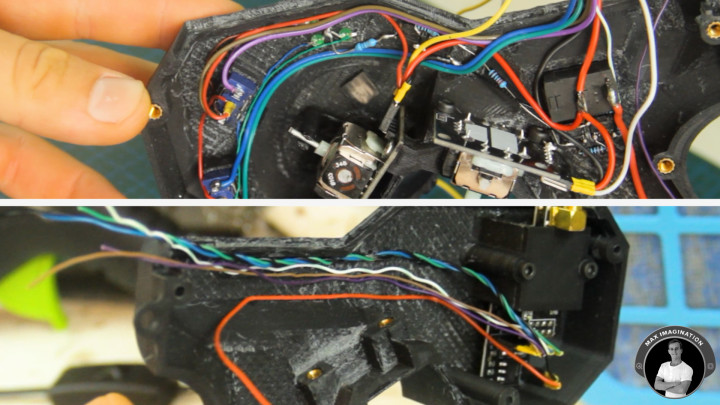
To keep wiring tidy and out of the way of moving parts or from peeking out of the enclosure, we can super glue wires to the walls in either shell while twisting wires - MOSI and MISO data lines together on the left shell to reduce electrical noise across such distance in the data transmission.
For best results when finishing connections and closing up the transmitter, ensure all wires from the left and right shells meet at the top rear of the transmitter.
11. Assembling The Top Panel
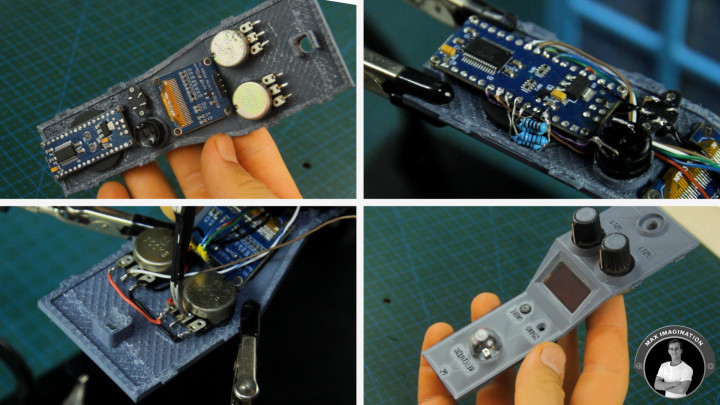
Now we're focusing on the top cover. Out of the remaining parts, we'll use the 3D printed ring and begin installing a rubber primer bulb normally for gasoline weedwacker engines, but used here as a translucent button cap for pressing the Arduino's reset button and viewing its LEDs.
Speaking of which, we need to desolder the Arduino nano's pin headers one by one, leaving us with a more compact microcontroller board which we'll secure with 4 tiny screws onto the underside of the top cover followed by the mode button with its cap and holder screwed into place. Right next to it, we'll insert an active piezo buzzer for sound indication. Then we can mount the tiny I2C OLED display for showing input values, battery voltage and more info.
Moving on down, we have the potentiometers - each have 100 kiloohms of resistance, but 10K ohms will work fine as well. To match the top cover, I've also printed matching color caps on each rotary knob.
We’ll begin doing the top panel's wiring by starting with connecting common grounds and power connections along with the input from each sensor. Let's ensure as many wires as possible are tucked in between and under other components to keep things tidy and out of the way of the shells which will connect to the sides.
To stabilize the inputs from the toggle switches, we'll take x4 10K ohm pull down resistors connecting input pins to ground not to leave any in a floating state.
12. Wiring Panels To One Another
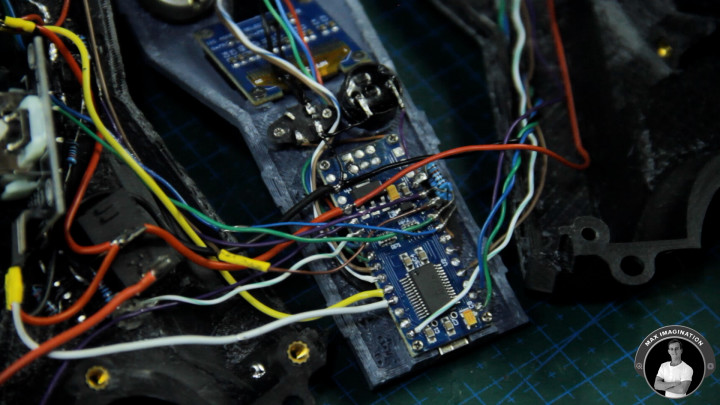 Now, we should be left with 3 wired panels.
Each shell should have wires for input & power sticking out which connect to the Arduino in the middle according to the wiring diagram shown before.
Let’s be sure to keep connections as short as possible between each panel/shell while leaving enough wire to rearrange the panels when closing them up.
13. Closing Up Shells
With the transmitter fully-wired, we can connect up the battery with the JST connectors we added earlier at the stand and test to see that the whole circuit gets power.
One thing I would add is to check for short circuits at the power terminals with a multimeter on continuity mode prior to powering on the transmitter. You may save yourself some hassle!
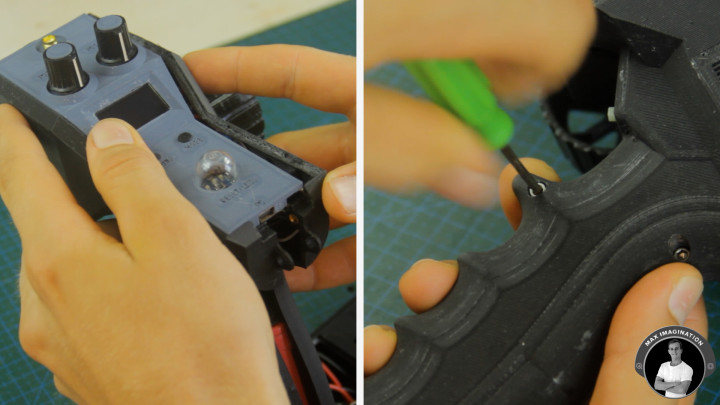
We’ll begin closing it up by first loosening the radio module so we can slide on the top panel which slots into each shell held down thanks to its tabs on each side.
Securing the shells together is as straightforward as fastening them with x6 M3 screws.
14. Attaching Stand
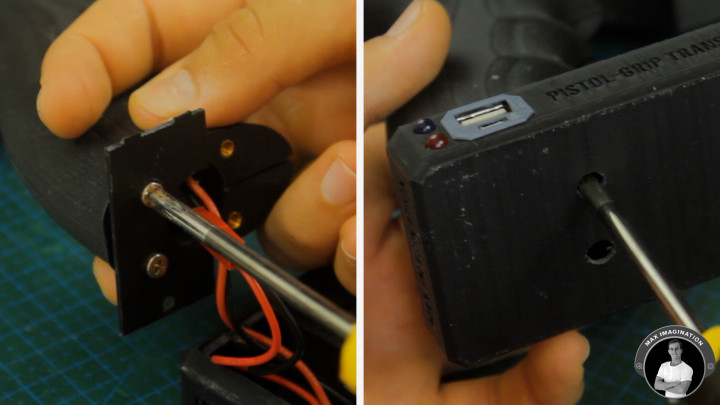
To attach the stand, we'll do so through first attaching this 3D printed plate to the bottom rear of the grip which then slides into the stand secured by a screw. Let’s make sure the power wires are tucked in well and then, the grip is further secured by two more flat screws in through the holes in the bottom of the stand, holding down the front while allowing the drawer to slide in and out uninterruptedly.
15. Complete Transmitter
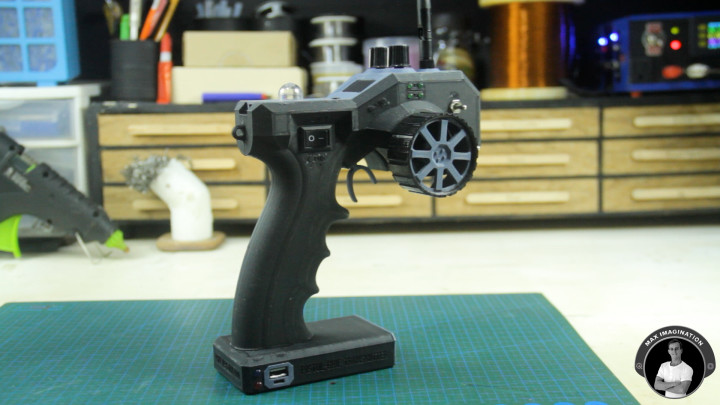
We’ll finish off assembling the transmitter by attaching remaining parts such as the throttle trigger to the joystick’s trimmed stick and the 2.4ghz antenna which comes with the NRF24L01 radio module.
With that, the transmitter is complete!
We should have a working steering wheel that retracts back to centered position from every turn, a throttle trigger with full range of forward-reverse motion, potentiometers that make 0-270° turns in the clockwise direction, toggle switches that turn their corresponding LEDs on based on switch position, trimming and mode buttons that press in and out without getting stuck, charging ports that allow for devices and the transmitter itself to be charged, and a working power switch to turn the whole transmitter on.
16. Programming Transmitter
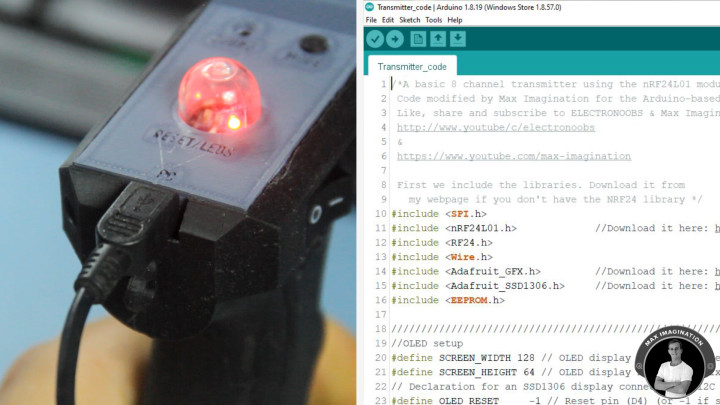
To program the transmitter, we'll connect it up to our PC and open the transmitter code which you can find linked with the other resource files.
Full credits for the code go to Electronoobs - a fellow Maker and YouTuber who made an Arduino 6-channel thumbstick transmitter. I happened to pick most of its handy features for my transmitter, but placed and used differently.
If you're looking to control planes or drones, you can follow his transmitter video tutorial linked here: https://www.youtube.com/watch?v=YMF5NXeHOnk&t=25s
On the right-hand side image, you’re looking at the transmitter code. For mine however, I modified it by renaming input variables and adding 2 extra channels for one more AUX switch now having 8 channels of control, which I divided to have 4 output PWM signals to channels 1 through 4 at the receiver for proportionate control of motors and servos as well as 4 other channels for digital HIGH and LOW output to turn headlights and horns on or off.
I also optimized the part of the code that handles values outputted to the display according to my changes.
All inputs and output pins are defined for you. All we need to do is check that our board - the Arduino Nano, Processor (ATmega328p - Old Bootloader), and COM port are selected according to our hardware setup.
With all that in order, we can hit upload and wait for the transmitter to boot up.
17. Setting Up Channels
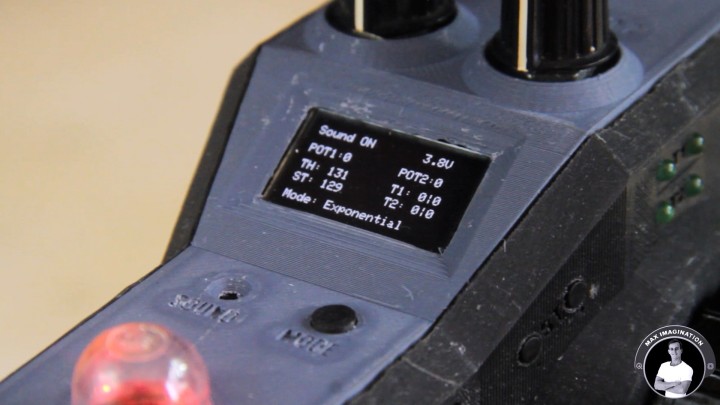
With the code uploaded, this is how the info layout at the display should appear on our transmitter.
As the trigger, steering wheel, toggle switches, and potentiometers are moved, we should see how the values change on-screen accordingly.
To trim the throttle value so we end up getting accurate 0 to 255 PWM values at the output, we press either of the two buttons below the power switch to raise or lower the midpoint/resting value to 127 or 129 and likewise for the steering value using the upper 2 buttons.
And to invert the throttle or steering, we hold down on that specific forward facing button from either pair of trimming buttons.
However, to trim the potentiometers, we can manually adjust the midpoint values in the code (on lines 525 & 526 in the transmitter code) if they happen to be offset.
By pressing the "Mode" button on the top panel, we change the ramping of the input values either to "Linear" for a consistent increase in value or "Exponential" for an upward curve for gradual speed increase. And by holding down on the Mode button long enough, we can turn the sound indication feature on or off.
Each toggle switch when flicked has its corresponding side green LED turned on with the switch status updated on the display.
At the top right of the display is where we have the transmitter battery’s voltage gauge. Monitor it regularly when using the transmitter not to forget to charge it when it goes low.
18. Charging
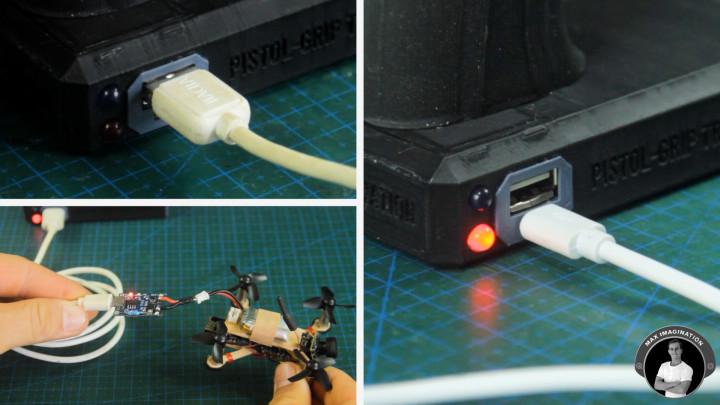
To charge the transmitter, we connect a phone charger with a micro-USB end and plug it into the smaller port below. Charging time for the transmitter’s 6000mAh battery pack is around 3-6 hours depending on the charger used.
In using the port above, this turns the transmitter into a power bank to charge devices or lithium cells for smaller (low-power) RC vehicles that you wish to control. The transmitter on a full charge may have just enough juice to recharge your phone from 0-100%!
19. Extra Features
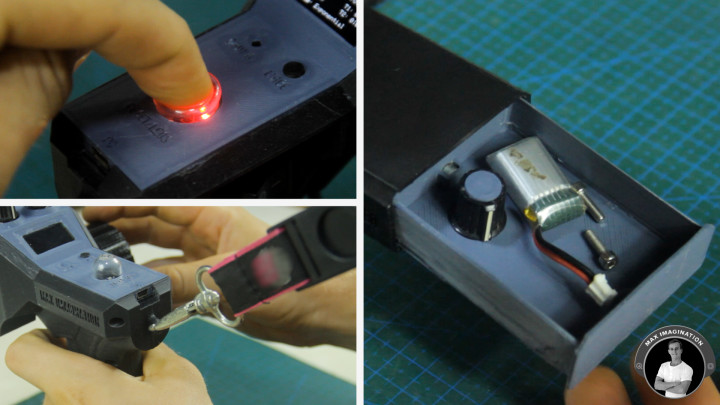
On the top cover, there is a bulb that can be used either to reset the Arduino or simply use it to view the LEDs.
And at the top rear, there’s a loophole for those who prefer to wear a neck strap to rest the transmitter.
Within the base/stand we get a small drawer that slides out to store smaller tools, spare parts, or anything that can fit.
20. Parts and Components for Receiver
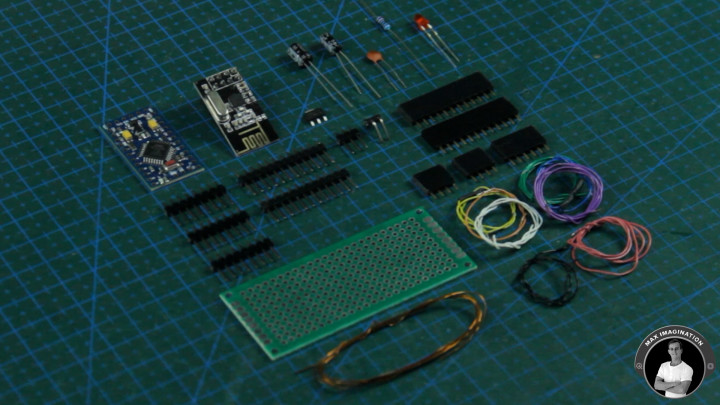
Next up, we're making the receiver unit which allows for the transmitter to connect to the RC vehicle we wish to control.
Materials, Parts, & Components list for the receiver:
21. Circuit Diagram - Arduino 8 Channel Receiver
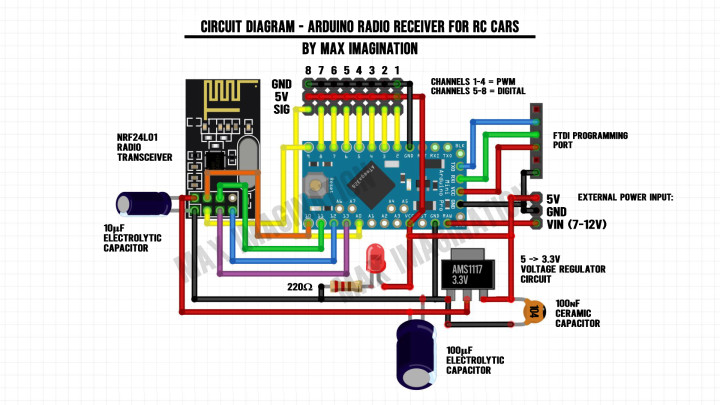
This is the Arduino receiver’s wiring diagram. Following it with the quick guide below will ensure the receiver turns out functional and without errors.
You can download the receiver’s diagram included in the resources folder linked at the top of this blog.
Wiring a power input header is completely optional, but it can help if we want to connect an external power source
Keep in mind that the layout of the wiring diagram may vary from the actual wired receiver, however, with the same exact connections.
22. Placing Components and Wiring
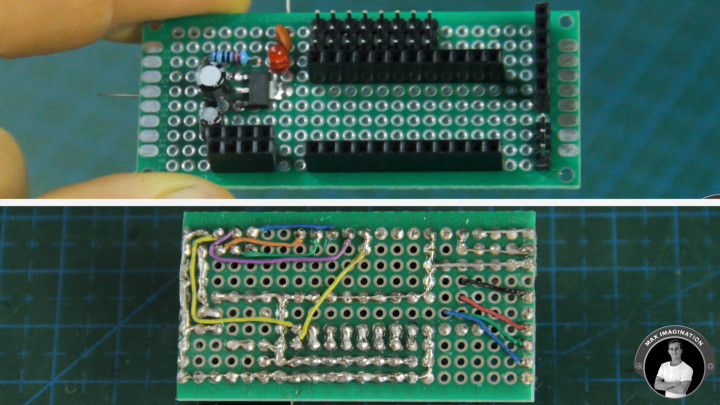
Let’s begin making the receiver board by taking a 3x7cm perforated board and trim the female and male pin headers to size according to each module, the number of output channels, and number of power inputs available - then place them on the circuit board according to the layout shown above.
For the radio module's power regulation, we'll solder an AMS1117 voltage regulator with input and output filtering capacitors along with a current limited power LED. This gives the NRF24L01 a clean 3.3V supply.
We'll then bend pins and tape down headers so we can flip the board around without parts falling out to begin securing each one with solder.
Let's make ground and power our first connections before moving onto signal wiring.
For external power input, we have a 3-pin header for VIN, GND, and 5V.
The remaining male header row of pins connects to 7 of the Arduino's digital pins (D2-8) with the last male header pin connecting to an Analog one via a wire (A0) set for digital output in the code. This was done as pin 9 had to be used for the radio module.
To connect the radio module's SPI data lines, we'll use some more of this 30-gauge wire for CE, CSN, MOSI, MISO, and SCK. We'll additionally connect the Arduino’s power and communication wires from the FTDI to reach through to the Arduino Pro Mini on the other side.
We'll also give the Pro Mini some legs (pin headers) before inserting it and the radio module into the board.
Those FTDI-allocated wires that stick out can then connect to the Arduino’s pins for the computer connection
We’ll finish up by checking for potential shorts between power lines before testing the receiver.
We can finally push in the NRF24 radio transceiver into the circuit. If space doesn’t concern you and you want a greater range, you can upgrade to the power amplified version (NRF24L01+PA+LNA).
Trimming the board is completely optional, but makes the receiver look more compact.
23. Programming Receiver
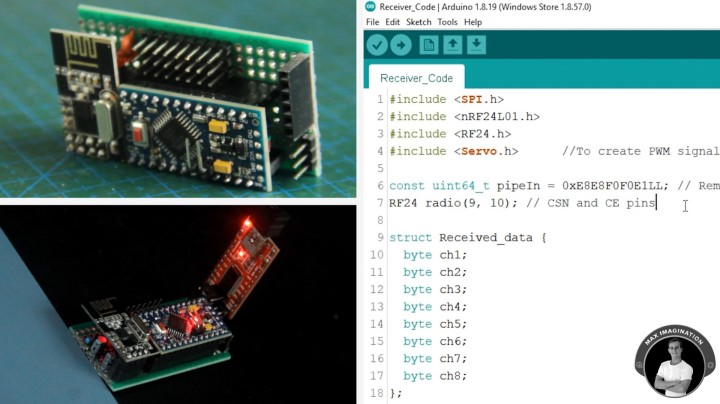
To connect the finished receiver for programming, we'll select 5V through a tiny jumper onboard the FTDI (USB to serial converter) and connect the receiver through it to our PC.
The receiver code is all adjusted for you and can be found linked as well with the other resource files. All we need to change this time is the board we're uploading to and then we can hit upload.
However, with the Pro Mini, you'll most likely need to press its reset button immediately after it states "Uploading" so the code flashes to the board successfully.
24. Receiver Connected to RC System
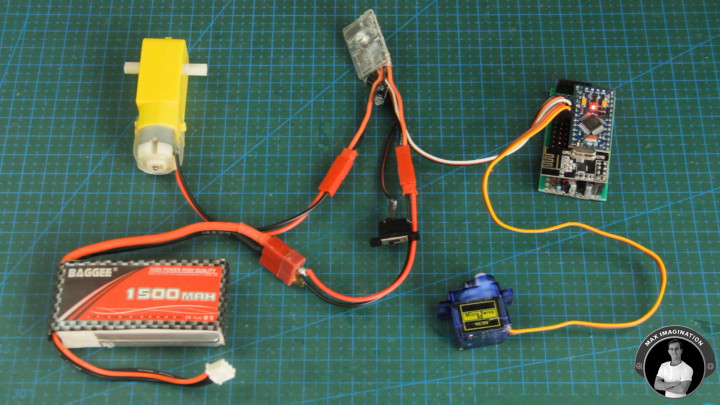
Now, let's test the Arduino-based transmitter and receiver on a brushed hobby-grade RC system. We’ll have the Brushed 2S ESC for driving a car connected to channel 1 (Powering the receiver through its built-in BEC) and a 9g servo motor for steering hooked up to channel 2. We'll connect the drive motor to the speed controller followed by the 2S battery.
With the circuit powered on through the ESC, it's ready for testing!
25. Transmitter-Receiver Demo
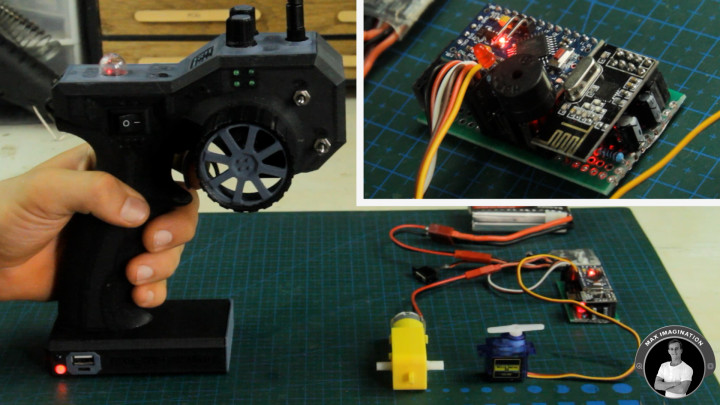
We now have Arduino-based proportionate control of an RC car system including forward/reverse drive, steering, and more.
The trim feature comes in useful for adjusting steering midpoints on a servo. Especially the reverse channel feature - when pressing one of the forward-facing buttons to change the direction a motor turns. This comes in super handy when you realize your RC car’s steering is reversed.
If we change channels to 3 or 4, we can control a motor with either of the potentiometers.
Additionally, we can hook up lights to the upper 4 channels to toggle them on or completely off with the switches. You can get more creative and even add a buzzer for a car horn!
26. Testing Arduino Radio System with RC Car
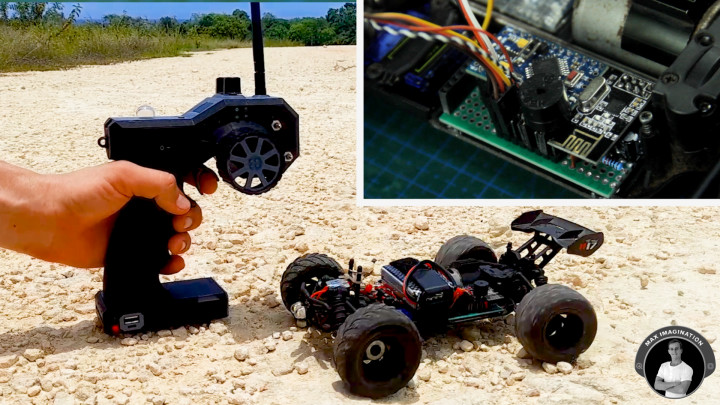
Now let's take things up a notch and set up an old, gutted 4WD hobby grade RC car with full suspension and a brushed motor now to be controlled with an Arduino RC system.
I've also given it a pair of headlights which are current-limited and driven through a custom MOSFET driver circuit controlled through the Arduino receiver.
From the parts seen earlier, I mounted the brushed ESC, Servo motor, and Arduino receiver. Then connected up the motors, headlights, piezo buzzer horn, and finally - the 2-cell battery.
From my tests, the Arduino transmitter seems to have an exceptional range of well over 200M with only the smaller radio module on the receiving end, while instead a power-amplified transceiver like in the transmitter would most likely extend the car’s control range to well over 1KM as advertised.
However, the smaller receiver antenna (100-200M range) is more than enough for RC cars.
Driving an Arduino-based RC car as such is super fun, especially knowing you’ve spent the time to build it or the unit that controls it.
Conclusion and Key Takeaways
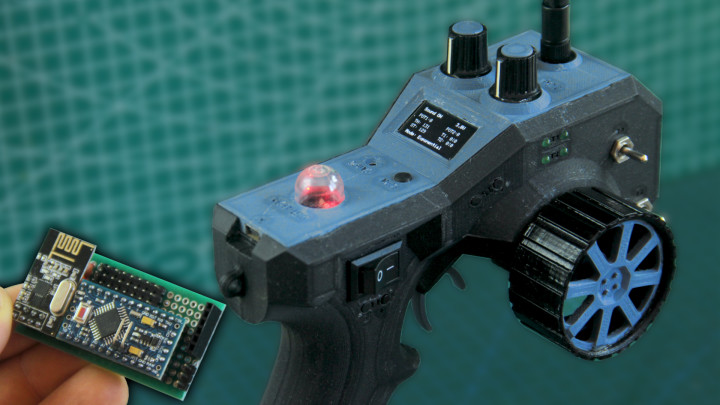 To summarize what we’ve gone through making, we started with a mere 3D design, installed parts, programmed, and tested the Arduino Pistol-grip Transmitter with its Receiver for controlling RC cars, boats, hovercraft, or anything that needs to drive and steer.
With good headroom for peripheral options, there are many things you can control with this transmitter knowing you have the added potentiometers and toggle switches - maybe even a robotic car!
On your journey in building your first RC transmitter and receiver, you may encounter some issues along the way when putting one together, so among the key takeaways below, you may find some useful tips to take note of.
Key Takeaways:
Transmitter
Receiver
In conclusion, this project offers a versatile, long-range, and durable control solution for various RC projects. With taking on the thorough instructions and paying careful attention to detail, you can create a reliable transmitter with extensive features like adjustable inputs, power bank functionality, and an integrated charging system, all while controlling throttle and steering of any Arduino-based vehicle you desire to build, enhancing your DIY RC experience.
Once again, download the project’s diagrams, code, and more here:
https://drive.google.com/drive/folders/1LM2x4gF254C3RxLSz5IIrHGuNWugVfy5?usp=sharing
To see the video tutorial and how the transmitter works, watch my YouTube video embedded below.

This DIY transmitter has 8 channels of control inputs, 1KM of operating range, around 48 hours of battery life, has a comfortable feel and grip while being straightforward to build and use for intermediate level makers looking to get into the RC hobby with Arduino parts.
With its high-power NRF24L01 radio transceiver module, the transmitter pairs up to an Arduino-based receiver containing 8 channels - 4 pins with PWM (0-255) for motors and servos and 4 pins with digital (HIGH/LOW) control for lights, horn, and other peripherals.
Parts and Materials for Transmitter

- (x1) Arduino Nano Microcontroller Board - https://amzn.to/3x9lRyE
- (x1) NRF24L01 + PA + LNA Transceiver with power adapter - https://amzn.to/4egUEuO
- (x2) Joysticks - https://amzn.to/3yTXOo1
- (x2) Potentiometers - https://amzn.to/3RfDiEw
- (x2) Toggle switches - https://amzn.to/4ef1MYh
- (x5) Pushbuttons - https://amzn.to/4eclBzE
- (x1) OLED - https://amzn.to/3Vzdd67
- (x1) Buzzer - https://amzn.to/3KzZyFj
- (x4) 3mm LEDs - https://amzn.to/3XfCtPU
- (x2) LEDs for charge indication - https://amzn.to/45cXL2F
- (x1) 5V boost converter - https://amzn.to/3XbuQd9
- (x1) Power switch - https://amzn.to/3yTaKdK
- (x2) 18650 cells - https://amzn.to/4bNmdKz
- (x1) Power connector Pair - https://amzn.to/3yWjTlW
- (x6) 10K Resistors (all found in resistor kit) - https://amzn.to/3ViIRmX
- (x1) 3.3K Resistor
- (x1) 2.2K Resistor
- (x1) 2K Resistor
- (x1) 1K Resistor
- (x1) 330 Ohm Resistor
- (x1) Female header row - https://amzn.to/3KFX1JH
- 30AWG wire - https://amzn.to/3KylmRO
- 24AWG Wire - https://amzn.to/4aVleGX
- (x18) M3 Threaded Inserts - https://amzn.to/3Kz4MRL
- (x18) M3 screws - https://amzn.to/3XehJbp
- (x2) 5mm Neodymium Magnets - https://amzn.to/3VwQszx
- (x1) Primer Bulb - https://amzn.to/4c6XQHg
3D Printing Supplies and Equipment:
- (x1) Matte Black PLA Filament - https://amzn.to/4c6wr8g
- (x1) Matte Dark Grey PLA Filament - https://amzn.to/4c8KeLI
- 3D Printer I use: Creality Ender 3 V2 - https://amzn.to/45igolH
Download the Project Resource Files:
https://drive.google.com/drive/folders/1LM2x4gF254C3RxLSz5IIrHGuNWugVfy5?usp=sharing
1. 3D Printing Parts

Initially, I started with a prototype breadboard circuit to test each functionality of the upcoming transmitter with roughly connected components I planned to use all of which I then 3D modeled one by one into the CAD software known as Fusion 360.
Each exact part dimension allowed me to accurately design the top cover, the grip inspired by a Desert Eagle pistol, and from there - the rest of the transmitter while shelling the halves, designing moving parts and fittings for every single component which leads us to the final 3D design of the grip-style transmitter you see printed out in the layed out parts seen above.
You can purchase the 3D model here - https://cults3d.com/en/3d-model/game/arduino-grip-style-transmitter-for-rc-cars-and-boats-8ch-radio-controller
You may find print settings and more details about printing the parts on that page.
With all parts printed out, we need to remove any support material using either a knife, pick, or through the warm water method which leaves us with both transmitter halves, stand pieces, button, and securing pieces in black while having the wheel, trigger, port cover, drawer, and top cover in Dark-gray filament.
We can additionally tape up and paint certain parts for color contrast like the steering wheel to make it look as if it has a tire.
2. Installing Threaded Inserts

For securing parts together, we'll melt in these brass M3 threaded inserts with a soldering iron into the 4-millimeter holes.
We will need to install 18 of these distributed into the left and right shells, stand piece, and wheel.
We might even need to sand down brass inserts that get placed in shallow holes like the two that are being melted into as seen in the image.
3. Installing Wheel Assembly And Joysticks

Moving onto the steering wheel assembly, the rotary joint between the wheel and right shell can be sanded, have super glue added to contact points, and be worn in for smoother rotation.
Pieces under tension like the steering link can be strengthened with superglue to avoid being broken. We can then secure the steering link piece to the wheel through the right shell using a longer M3 bolt.
The first components which we'll install are the joystick modules.
We need to first trim off enough of the steering joystick stick for it to fit into the steering assembly and then melt in a piece of steel bicycle spoke with 10mm protruding out to give the necessary control stick to connect with the steering link. We can then secure this Joystick with M3 screws followed by installing the throttle joystick in the corresponding cavity with its control stick trimmed as well. It too, is only bolted with two M3 bolts to the right shell and none attaching it to the opposite shell.
One mistake you can avoid here is securing joysticks with bolts directly to the PCB as this can potentially cut into tracks and cause a short circuit. This however, can be prevented using plastic washers.
4. Installing Components Into Shells

Next, we can continue installing other components into the shells such as the toggle switches followed by the trimming push buttons which need to be secured with super glue carefully at the edges to avoid seizing their movement. They should protrude enough so you can press them.
The next component we'll install is the 2-pin (SPST) rocker-style power switch followed by the 3mm green LEDs for toggle switch status indication with their cathode pins facing one another.
We can then secure the power-amplified NRF24L01 radio transceiver with its 3D printed plastic holder and 2 bolts.
5. Circuit Diagram - Arduino Pistol-grip Transmitter

The transmitter’s connections from a glance will seem complicated, however, this wiring diagram takes the confusion away and gives you a good reference to look back at as you’re wiring your transmitter.
You can download the diagram included in the resources folder linked at the top of this blog.
To ensure connections are on-point, following along to the tutorial using the circuit diagram is crucial in succeeding with this Arduino-based transmitter.
As we move forward with this guide in working on connecting components and modules, let’s pay close attention to the wiring with every following step in the transmitter’s circuit assembly, especially looking closely at the resistive analog push button circuit.
6. Assembling The Stand

Moving onto the stand, let's configure this 5V boost converter (power bank module) with an extended and replacement pair of LEDs to indicate the battery's charging status.
Each of the 5mm LEDs replace the SMD LEDs which are desoldered off the board prior to soldering the new charging indicator LEDs connected through 30-gauge wire.
We’ll then solder 24-gauge wires directly to the outer USB port pins for 5V power output and a female connector at the B+ and B- terminals for the battery input. This power module gets secured with just one screw to prevent wriggling inside the stand/base while its LEDs are super glued into the holes beside it.
For the drawer-stand assembly, we can slot in a couple of 5mm neodymium magnets with attracting poles facing one another in the corresponding pockets (one in either part) to keep the drawer from sliding out of the base by itself.
For the aesthetics of it, we'll superglue a 3D printed cover piece around the power output and input charging ports.
7. Connecting Switches and LEDs

Now, we'll begin soldering resistors (10K, 3.3K, 2.2K, 2K, and 1K Ohms) between the trimming pushbuttons to form a resistive, voltage-divider analog input for the Arduino to tell which button is being pressed - analogous to a potentiometer with different activation thresholds set in the code. This helps minimize the number of pins used up from the board.
Once this resistive trimming button circuit is made, we can solder an analog output wire to the top right node and daisy-chain all ground connections across components such as the joystick modules followed by a ground connection for the 4 LEDs wired through a 330-Ohm current-limiting resistor.
From here, we can wire the LEDs to each corresponding outer toggle pin for switch status indication followed by a common (5V) power connection connecting the middle pins and wires from each switch going toward where the Arduino will sit.
8. Soldering Wires and Connectors

With all the components installed into the shells, we can begin preparing wired connectors to connect components with remaining pin headers.
Let's take a female pin header row and cut connectors sized for the radio module power and SPI communication lines, joysticks’ power and analog X-axis pins, and for the display’s power and I2C communication lines to which we'll solder corresponding colored wires.
Every single wired connection seen in the images can be matched by color according to the wiring diagram linked with all the other resource files.
9. Connecting Power and Grounds

Next up, for power, let's wire a 6000mAh 3.7-volt parallel battery pack together using two 18650 lithium-ion cells which you can extract either from laptop batteries or purchase via one of the links at the parts list.
We'll continue by securing the battery to the shell with hot glue followed by having underlying wires coming from the power module in the base wired up to the switch and the circuit’s common ground (GND).
Additionally, we'll solder a wire to the battery’s “+” terminal for voltage monitoring.
Let's also ensure each remaining component has its 5V power connections hooked up to the circuit.
10. Wire Management

To keep wiring tidy and out of the way of moving parts or from peeking out of the enclosure, we can super glue wires to the walls in either shell while twisting wires - MOSI and MISO data lines together on the left shell to reduce electrical noise across such distance in the data transmission.
For best results when finishing connections and closing up the transmitter, ensure all wires from the left and right shells meet at the top rear of the transmitter.
11. Assembling The Top Panel

Now we're focusing on the top cover. Out of the remaining parts, we'll use the 3D printed ring and begin installing a rubber primer bulb normally for gasoline weedwacker engines, but used here as a translucent button cap for pressing the Arduino's reset button and viewing its LEDs.
Speaking of which, we need to desolder the Arduino nano's pin headers one by one, leaving us with a more compact microcontroller board which we'll secure with 4 tiny screws onto the underside of the top cover followed by the mode button with its cap and holder screwed into place. Right next to it, we'll insert an active piezo buzzer for sound indication. Then we can mount the tiny I2C OLED display for showing input values, battery voltage and more info.
Moving on down, we have the potentiometers - each have 100 kiloohms of resistance, but 10K ohms will work fine as well. To match the top cover, I've also printed matching color caps on each rotary knob.
We’ll begin doing the top panel's wiring by starting with connecting common grounds and power connections along with the input from each sensor. Let's ensure as many wires as possible are tucked in between and under other components to keep things tidy and out of the way of the shells which will connect to the sides.
To stabilize the inputs from the toggle switches, we'll take x4 10K ohm pull down resistors connecting input pins to ground not to leave any in a floating state.
12. Wiring Panels To One Another
 Now, we should be left with 3 wired panels.
Each shell should have wires for input & power sticking out which connect to the Arduino in the middle according to the wiring diagram shown before.
Let’s be sure to keep connections as short as possible between each panel/shell while leaving enough wire to rearrange the panels when closing them up.
13. Closing Up Shells

With the transmitter fully-wired, we can connect up the battery with the JST connectors we added earlier at the stand and test to see that the whole circuit gets power.
One thing I would add is to check for short circuits at the power terminals with a multimeter on continuity mode prior to powering on the transmitter. You may save yourself some hassle!
We’ll begin closing it up by first loosening the radio module so we can slide on the top panel which slots into each shell held down thanks to its tabs on each side.
Securing the shells together is as straightforward as fastening them with x6 M3 screws.
14. Attaching Stand

To attach the stand, we'll do so through first attaching this 3D printed plate to the bottom rear of the grip which then slides into the stand secured by a screw. Let’s make sure the power wires are tucked in well and then, the grip is further secured by two more flat screws in through the holes in the bottom of the stand, holding down the front while allowing the drawer to slide in and out uninterruptedly.
15. Complete Transmitter

We’ll finish off assembling the transmitter by attaching remaining parts such as the throttle trigger to the joystick’s trimmed stick and the 2.4ghz antenna which comes with the NRF24L01 radio module.
With that, the transmitter is complete!
We should have a working steering wheel that retracts back to centered position from every turn, a throttle trigger with full range of forward-reverse motion, potentiometers that make 0-270° turns in the clockwise direction, toggle switches that turn their corresponding LEDs on based on switch position, trimming and mode buttons that press in and out without getting stuck, charging ports that allow for devices and the transmitter itself to be charged, and a working power switch to turn the whole transmitter on.
16. Programming Transmitter

To program the transmitter, we'll connect it up to our PC and open the transmitter code which you can find linked with the other resource files.
Full credits for the code go to Electronoobs - a fellow Maker and YouTuber who made an Arduino 6-channel thumbstick transmitter. I happened to pick most of its handy features for my transmitter, but placed and used differently.
If you're looking to control planes or drones, you can follow his transmitter video tutorial linked here: https://www.youtube.com/watch?v=YMF5NXeHOnk&t=25s
On the right-hand side image, you’re looking at the transmitter code. For mine however, I modified it by renaming input variables and adding 2 extra channels for one more AUX switch now having 8 channels of control, which I divided to have 4 output PWM signals to channels 1 through 4 at the receiver for proportionate control of motors and servos as well as 4 other channels for digital HIGH and LOW output to turn headlights and horns on or off.
I also optimized the part of the code that handles values outputted to the display according to my changes.
All inputs and output pins are defined for you. All we need to do is check that our board - the Arduino Nano, Processor (ATmega328p - Old Bootloader), and COM port are selected according to our hardware setup.
With all that in order, we can hit upload and wait for the transmitter to boot up.
17. Setting Up Channels

With the code uploaded, this is how the info layout at the display should appear on our transmitter.
As the trigger, steering wheel, toggle switches, and potentiometers are moved, we should see how the values change on-screen accordingly.
To trim the throttle value so we end up getting accurate 0 to 255 PWM values at the output, we press either of the two buttons below the power switch to raise or lower the midpoint/resting value to 127 or 129 and likewise for the steering value using the upper 2 buttons.
And to invert the throttle or steering, we hold down on that specific forward facing button from either pair of trimming buttons.
However, to trim the potentiometers, we can manually adjust the midpoint values in the code (on lines 525 & 526 in the transmitter code) if they happen to be offset.
By pressing the "Mode" button on the top panel, we change the ramping of the input values either to "Linear" for a consistent increase in value or "Exponential" for an upward curve for gradual speed increase. And by holding down on the Mode button long enough, we can turn the sound indication feature on or off.
Each toggle switch when flicked has its corresponding side green LED turned on with the switch status updated on the display.
At the top right of the display is where we have the transmitter battery’s voltage gauge. Monitor it regularly when using the transmitter not to forget to charge it when it goes low.
18. Charging

To charge the transmitter, we connect a phone charger with a micro-USB end and plug it into the smaller port below. Charging time for the transmitter’s 6000mAh battery pack is around 3-6 hours depending on the charger used.
In using the port above, this turns the transmitter into a power bank to charge devices or lithium cells for smaller (low-power) RC vehicles that you wish to control. The transmitter on a full charge may have just enough juice to recharge your phone from 0-100%!
19. Extra Features

On the top cover, there is a bulb that can be used either to reset the Arduino or simply use it to view the LEDs.
And at the top rear, there’s a loophole for those who prefer to wear a neck strap to rest the transmitter.
Within the base/stand we get a small drawer that slides out to store smaller tools, spare parts, or anything that can fit.
20. Parts and Components for Receiver

Next up, we're making the receiver unit which allows for the transmitter to connect to the RC vehicle we wish to control.
Materials, Parts, & Components list for the receiver:
- (x1) Arduino Pro Mini (5V) - https://amzn.to/3RiAFC6
- (x1) NRF24L01 - https://amzn.to/45nt2jp
- (x1) AMS1117 3.3V - https://amzn.to/3yRNBbL
- (x1) 100nF (104) Capacitor - https://amzn.to/3yQ7nEm
- (x1) 100μF Capacitor (Optional) - https://amzn.to/3X8ktHc
- (x1) 10μF Capacitor - https://amzn.to/3X8ktHc
- (x1) 3mm Red LED - https://amzn.to/3XfCtPU
- (x1) 220 Ohm Resistor - https://amzn.to/3ViIRmX
- (x2) 1 Female and 1 male headers - https://amzn.to/3KFX1JH
- (x1) 3x7cm Perforated Board - https://amzn.to/3z0CwF2
- 30AWG wire - https://amzn.to/3KylmRO
21. Circuit Diagram - Arduino 8 Channel Receiver

This is the Arduino receiver’s wiring diagram. Following it with the quick guide below will ensure the receiver turns out functional and without errors.
You can download the receiver’s diagram included in the resources folder linked at the top of this blog.
Wiring a power input header is completely optional, but it can help if we want to connect an external power source
Keep in mind that the layout of the wiring diagram may vary from the actual wired receiver, however, with the same exact connections.
22. Placing Components and Wiring

Let’s begin making the receiver board by taking a 3x7cm perforated board and trim the female and male pin headers to size according to each module, the number of output channels, and number of power inputs available - then place them on the circuit board according to the layout shown above.
For the radio module's power regulation, we'll solder an AMS1117 voltage regulator with input and output filtering capacitors along with a current limited power LED. This gives the NRF24L01 a clean 3.3V supply.
We'll then bend pins and tape down headers so we can flip the board around without parts falling out to begin securing each one with solder.
Let's make ground and power our first connections before moving onto signal wiring.
For external power input, we have a 3-pin header for VIN, GND, and 5V.
The remaining male header row of pins connects to 7 of the Arduino's digital pins (D2-8) with the last male header pin connecting to an Analog one via a wire (A0) set for digital output in the code. This was done as pin 9 had to be used for the radio module.
To connect the radio module's SPI data lines, we'll use some more of this 30-gauge wire for CE, CSN, MOSI, MISO, and SCK. We'll additionally connect the Arduino’s power and communication wires from the FTDI to reach through to the Arduino Pro Mini on the other side.
We'll also give the Pro Mini some legs (pin headers) before inserting it and the radio module into the board.
Those FTDI-allocated wires that stick out can then connect to the Arduino’s pins for the computer connection
We’ll finish up by checking for potential shorts between power lines before testing the receiver.
We can finally push in the NRF24 radio transceiver into the circuit. If space doesn’t concern you and you want a greater range, you can upgrade to the power amplified version (NRF24L01+PA+LNA).
Trimming the board is completely optional, but makes the receiver look more compact.
23. Programming Receiver

To connect the finished receiver for programming, we'll select 5V through a tiny jumper onboard the FTDI (USB to serial converter) and connect the receiver through it to our PC.
The receiver code is all adjusted for you and can be found linked as well with the other resource files. All we need to change this time is the board we're uploading to and then we can hit upload.
However, with the Pro Mini, you'll most likely need to press its reset button immediately after it states "Uploading" so the code flashes to the board successfully.
24. Receiver Connected to RC System

Now, let's test the Arduino-based transmitter and receiver on a brushed hobby-grade RC system. We’ll have the Brushed 2S ESC for driving a car connected to channel 1 (Powering the receiver through its built-in BEC) and a 9g servo motor for steering hooked up to channel 2. We'll connect the drive motor to the speed controller followed by the 2S battery.
With the circuit powered on through the ESC, it's ready for testing!
25. Transmitter-Receiver Demo

We now have Arduino-based proportionate control of an RC car system including forward/reverse drive, steering, and more.
The trim feature comes in useful for adjusting steering midpoints on a servo. Especially the reverse channel feature - when pressing one of the forward-facing buttons to change the direction a motor turns. This comes in super handy when you realize your RC car’s steering is reversed.
If we change channels to 3 or 4, we can control a motor with either of the potentiometers.
Additionally, we can hook up lights to the upper 4 channels to toggle them on or completely off with the switches. You can get more creative and even add a buzzer for a car horn!
26. Testing Arduino Radio System with RC Car

Now let's take things up a notch and set up an old, gutted 4WD hobby grade RC car with full suspension and a brushed motor now to be controlled with an Arduino RC system.
I've also given it a pair of headlights which are current-limited and driven through a custom MOSFET driver circuit controlled through the Arduino receiver.
From the parts seen earlier, I mounted the brushed ESC, Servo motor, and Arduino receiver. Then connected up the motors, headlights, piezo buzzer horn, and finally - the 2-cell battery.
From my tests, the Arduino transmitter seems to have an exceptional range of well over 200M with only the smaller radio module on the receiving end, while instead a power-amplified transceiver like in the transmitter would most likely extend the car’s control range to well over 1KM as advertised.
However, the smaller receiver antenna (100-200M range) is more than enough for RC cars.
Driving an Arduino-based RC car as such is super fun, especially knowing you’ve spent the time to build it or the unit that controls it.
Conclusion and Key Takeaways
 To summarize what we’ve gone through making, we started with a mere 3D design, installed parts, programmed, and tested the Arduino Pistol-grip Transmitter with its Receiver for controlling RC cars, boats, hovercraft, or anything that needs to drive and steer.
With good headroom for peripheral options, there are many things you can control with this transmitter knowing you have the added potentiometers and toggle switches - maybe even a robotic car!
On your journey in building your first RC transmitter and receiver, you may encounter some issues along the way when putting one together, so among the key takeaways below, you may find some useful tips to take note of.
Key Takeaways:
Transmitter
- Build a 3D printed Arduino-based pistol-grip radio transmitter for RC cars, boats, etc.
- 8 channels of control inputs, 1KM maximum range, 48-hour battery life.
- Uses parts including Arduino Nano, NRF24L01, joysticks, potentiometers, LEDs, and 3D printing filament
- Links are provided for purchasing materials.
- 3D model parts are provided for purchase and download.
- Use PLA Filament with different colors for color-contrast.
- Install joystick modules and steering assembly; avoid short circuits by using plastic washers.
- Avoid unexpected behavior on the outputs by ensuring the correctly matched joystick pins in the transmitter are connected firmly and according to the diagram.
- Use higher-quality joysticks such as Playstation 4 joysticks for a wider range of detected movement in steering and throttle controls.
- For longer range, use the NRF24L01P E01ML01DP5 version of the transceiver module.
- Use resistive analog input for buttons to minimize pin usage.
- Spot-weld battery terminals instead of soldering when making the battery pack to avoid overheating the cells.
- Ensure proper power and ground connections are wired and tested with a multimeter against short circuits before powering a circuit.
- Attach neodymium magnets for drawer stability.
- Avoid messing up plastic thread inserts by using shorter screws in panels when securing components.
- Implement tidy wiring
- Use pull-down resistors to stabilize toggle switch inputs.
- Adjust input values and settings via the display and the connected buttons for a well-optimized transmitter. Test and calibrate throttle, steering, and switches.
Receiver
- Use a perforated board or better - PCB, 3.3V voltage regulator, and proper (short) wiring for stability and minimal electrical noise.
- Use the power amplified NRF24L01 with antenna on the receiving end to achieve a total 1KM of range with the transmitter.
- Use I2C connector on top of Arduino Pro Mini to give the receiver a display for e.g. A vehicle’s information.
In conclusion, this project offers a versatile, long-range, and durable control solution for various RC projects. With taking on the thorough instructions and paying careful attention to detail, you can create a reliable transmitter with extensive features like adjustable inputs, power bank functionality, and an integrated charging system, all while controlling throttle and steering of any Arduino-based vehicle you desire to build, enhancing your DIY RC experience.
Once again, download the project’s diagrams, code, and more here:
https://drive.google.com/drive/folders/1LM2x4gF254C3RxLSz5IIrHGuNWugVfy5?usp=sharing
To see the video tutorial and how the transmitter works, watch my YouTube video embedded below.


Discussie (0 opmerking(en))