

Environmental Monitoring System with ESP32
Monitors background radiation and other environmental parameters and sends data to IOT platforms.
Many people are afraid of radioactivity and nuclear power plants due to articles in the mainstream media and the constant fear mongering of anti-nuclear organizations. The fact that you can't see, hear, taste or smell nuclear radiation and distrust of the goverment tends to worsen this fear and discomfort with the general population.
Building a radiation meter/monitor yourself lowers the risk of getting tainted/biased/wrong/no data, especially when you really need it. When in the aftermath of the Chernobyl disaster, radioactive clouds reached the Netherlands and Belgium around May 2nd, 1986, no action was taken by the Belgian authorities. Weatherman Armand Pien was even not allowed to mention the radiation from the radioactive cloud on television during his weather forecast. While there were restrictions on selling fresh leafy vegetables and a grazing ban in the Netherlands, it was just sunny weather in Belgium.
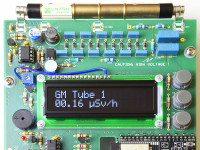
The design presented here uses a Russian SBM-20 geiger müller tube which is sensitive to gamma and beta radiation. Electrical impulses from the tubes are counted and converted to a radiation level by an ESP32-devkitC module which sends the data to IOT platforms like ThingSpeak and OpenSenseMap at regular intervals. In addition, the radiation levels are also shown on a LC display.
The high voltage power supply is built around a 7555 based step up converter followed by a high voltage cascade. The output voltage is adjustable between approximately 250 and 550 V which covers several types of GM tubes. By replacing some components, an output voltage up to 1.1 KV is possible. At first we had a flyback converter in mind, but due to the declining popularity of CCFL backlights for LCDs, it becomes increasingly more difficult to find commercially available transformers which are suitable for higher voltages.
As the feedback loop is connected to the output of the cascade, the power dissipated by the feedback resistors, lowers the efficiency of the circuit significantly but this is not a real problem as the unit is not battery powered. Even with the ESP32-devkitC and the LCD backlight LEDs the total average power consumption stays below 1 W.
We designed the PCB for the well known and easily available Russian SBM-20 geiger müller tube. Other tubes like the SI-3BG and the SI-1G can be used as well. It is possible to connect a second external GM tube to the PCB. You can only use tubes with similar operating voltages (plateau voltage range) when using 2 different types simultaneously.
For testing purposes a visual and audible radiation indicator in the form of an LED and a buzzer is available. As the pulses from the GM tubes are very short (microseconds), a pulse stretching network built around a 4039 quad nand gate was added. This could also be done in software but we decided to reserve the computing power of the ESP32 for more important tasks. After all, with higher levels of radiation, the SBM-20 easily generates hundreds of pulses per second.
Unless you live near an uranium mine or a nuclear disaster area, natural background radiation levels are generally quite low with little variation. Monitoring background radiation can become boring after a while. To make things a little bit more exciting, the system can be expanded with extra sensors via the RJ45 jacks. Currently we are thinking about the following sensors for future expansion boards:
As such, the system becomes a "weather station" for environmental parameters.
For indoor use, sensors for temperature, humidity, barometric pressure, VOCs, CO2, ... can also be added, but that is up to the end user.
A final warning: the generated high voltage on the GM tubes is not dangerous and the current is limited by high voltage resistors R30 and R31 to a very low level which you will probably not feel at all. However, the high voltage on other parts of the circuit is potentially dangerous. It is not lethal but a shocking and very painful experience is guaranteed, so be very careful !
Building a radiation meter/monitor yourself lowers the risk of getting tainted/biased/wrong/no data, especially when you really need it. When in the aftermath of the Chernobyl disaster, radioactive clouds reached the Netherlands and Belgium around May 2nd, 1986, no action was taken by the Belgian authorities. Weatherman Armand Pien was even not allowed to mention the radiation from the radioactive cloud on television during his weather forecast. While there were restrictions on selling fresh leafy vegetables and a grazing ban in the Netherlands, it was just sunny weather in Belgium.
The design presented here uses a Russian SBM-20 geiger müller tube which is sensitive to gamma and beta radiation. Electrical impulses from the tubes are counted and converted to a radiation level by an ESP32-devkitC module which sends the data to IOT platforms like ThingSpeak and OpenSenseMap at regular intervals. In addition, the radiation levels are also shown on a LC display.
The high voltage power supply is built around a 7555 based step up converter followed by a high voltage cascade. The output voltage is adjustable between approximately 250 and 550 V which covers several types of GM tubes. By replacing some components, an output voltage up to 1.1 KV is possible. At first we had a flyback converter in mind, but due to the declining popularity of CCFL backlights for LCDs, it becomes increasingly more difficult to find commercially available transformers which are suitable for higher voltages.
As the feedback loop is connected to the output of the cascade, the power dissipated by the feedback resistors, lowers the efficiency of the circuit significantly but this is not a real problem as the unit is not battery powered. Even with the ESP32-devkitC and the LCD backlight LEDs the total average power consumption stays below 1 W.
We designed the PCB for the well known and easily available Russian SBM-20 geiger müller tube. Other tubes like the SI-3BG and the SI-1G can be used as well. It is possible to connect a second external GM tube to the PCB. You can only use tubes with similar operating voltages (plateau voltage range) when using 2 different types simultaneously.
For testing purposes a visual and audible radiation indicator in the form of an LED and a buzzer is available. As the pulses from the GM tubes are very short (microseconds), a pulse stretching network built around a 4039 quad nand gate was added. This could also be done in software but we decided to reserve the computing power of the ESP32 for more important tasks. After all, with higher levels of radiation, the SBM-20 easily generates hundreds of pulses per second.
Unless you live near an uranium mine or a nuclear disaster area, natural background radiation levels are generally quite low with little variation. Monitoring background radiation can become boring after a while. To make things a little bit more exciting, the system can be expanded with extra sensors via the RJ45 jacks. Currently we are thinking about the following sensors for future expansion boards:
- Sensirion SPS30 particulate matter sensor (not the cheapest but it has a very long lifetime of 8 years continuous operation)
- VEML6070 UV sensor
- SPEC Sensors 110-406 ozone sensor
As such, the system becomes a "weather station" for environmental parameters.
For indoor use, sensors for temperature, humidity, barometric pressure, VOCs, CO2, ... can also be added, but that is up to the end user.
A final warning: the generated high voltage on the GM tubes is not dangerous and the current is limited by high voltage resistors R30 and R31 to a very low level which you will probably not feel at all. However, the high voltage on other parts of the circuit is potentially dangerous. It is not lethal but a shocking and very painful experience is guaranteed, so be very careful !
Discussie (11 opmerking(en))
gmarchal 1 jaar geleden
https://www.elektor.de/amfile/file/download/file/2147/product/9464/
Is there any body to upload it?
I have time to builld the kit...
Merci
cvdo 4 jaar geleden
What is working:
5V rail is ok,
400V rail is ok.
The ESP32 has been programmed and is working
The ESP makes contact with my wifi and get an ip address through dhcp
I can connect to the ESP32 on port 5010 with telnet putty and it responds to commands such as "s d"
The buzzer is working. it buzzes whenever the geiger tube detects someting
The LCD backlight lights up
I have adjusted P2 for thje contrast of the LCD
The LCD shows 16 fully filled boxes on the top row, the bottom row is dark
I have looked at the I2C signals on pin 13/14 of the LCD. I see periodically some activity there.
I will add a scope picture (2V/DIV; 20us/DIV). It seems to transfer each time:
start 01111000 ack stop
It strikes me that the ack doesn't go all the way to 0V, it only goes down to 1.2V. Is that normal?
Thanks for any help
Charles
cvdo 4 jaar geleden
The fact that I already mentioned yesterday put me on the lead to solving the problem: the ACK signal in the I2C communication didn't go down to 0V, it went no further than 1.2V, and it should be below 0.5V or so.
So I removed both the LCD and the ESP and measured the resistance on both sides of the 2N7000 level shifter T6 (resistance over R7 and R8). And it was way too low on the 3V3 side: 164 ohm instead of 4k7. Likely culprit: the 2N7000. So I replaced it with a brand new one and problem solved!
Charles
Axiris 4 jaar geleden
I never had these problems with the BSN20 which I use a lot, but that is an SMD part.
Ilse
cvdo 4 jaar geleden
SJ1: bottom
SJ2: bottom
SJ3: open
SJ4: top
JakkeTet 4 jaar geleden
ik heb de kit bij Elektor gekocht en zou deze nu willen in mekaar knutselen, ik denk niet dat er een probleem is om dit tot een goed eind te brengen. Toen ik echter het schema wat van nabij wou bekijken viel mij op dat de resolutie hier op zijn zachtst uitgedrukt nogal wazig is. Is er ergens een tekening met een iets betere resolutie? Nu is het onmogelijk om de waardes van de componenten af te lezen zonder giswerk. Zie voorbeeld
Groeten,
Jacques Tiete
cvdo 4 jaar geleden
En hier staat de BOM, ook handig: https://www.elektormagazine.nl/magazine/elektor-144/57047
JakkeTet 4 jaar geleden
bedankt CVDO voor info, heb er ergens over gekeken...
Ga aan de montage beginnen een dezer maar heb nog wat andere projectjes lopen en ze zijn allemaal even interessant... :-)
Wil deze teller samen laten werken met een ander projectje waar ik, met mijn 1000x slimmere zoon, mee bezig zijn, een uitgebreid weerstationnetje gebaseerd op de originele versie van Elektor, zie:
https://github.com/JelmerT/esp32weatherstation
voor meer uitleg. Maar we zijn een iets andere weg uitgegaan met nieuw PCB enz. en vooral Platform.io wat een en ander serieus vereenvoudigt!
Iedereen veel knutselgenot voor 2021 !!!
Jacques
cvdo 4 jaar geleden
Heb je ook een (echte) CO2 sensor erbij?
Succes met bouwen
Charles
JakkeTet 4 jaar geleden
ja die staat erbij, het is een cheapo sjinees ding (dat "gouden" doosje) dat eigenlijk gemaakt is voor de kontrole van luchtkwaliteit in gebouwen, het spijtige hiervan is dat de minimum range pas vanaf 400ppm begint en nogal flink wat ruis heeft. Ik ben naar een andere op zoek die lager gaat en die ik evt. kan ijken (0 ppm) met droge stikstof maar die zijn "professioneel" met dan ook een professionele prijs... nochtans ben ik bereid hiervoor wat meer te betalen maar niet het bedrag dat ik krijg per maand van de Belgische Staat als pensioen... moet ook nog af en toe wat tussen de liezen kunnen steken! ;-)
we hebben ook problemen met de MAX31865 sensor met PT1000 dewelke soms kompleet de mist ingaat en we snappen echt niet waarom, soft? hard? geen idee.
Het project ligt nu wel wat stil maar ik hoop binnenkort verder te kunnen "prutsen"...
Jacques
cvdo 4 jaar geleden
Ik heb wel eens zitten experimenteren met zo'n CO2 equivalent sensor, maar die dingen meten de CO2 niet echt. Die meten van alles en leiden dan af wat waarschijnlijk het CO2 niveau is. Die start inderdaad vanaf 400ppm.
JakkeTet 4 jaar geleden
Dan kan je hem natuurlijk op 400ppm "automatisch kalibreren" maar écht 400ppm heb ik nog niet gevonden, het is meestal iets hoger en dat vind ik dan weer niet kunnen maar dat is wel genoeg voor het inschatten van de waardes voor het monitoren van de leefbaarheid in een gebouw.
https://www.esrl.noaa.gov/gmd/ccgg/trends/weekly.html
Het is meer van "er met de pet naar gooien" ipv een correcte meting en het is daar dat voor mij het schoentje wringt. En ja ik ben ook een zgn. "Timenut", precisie is mij met de paplepel ingegeven, mijn vader was horlogemaker... Misschien ben ik te veeleisend.
J.
Will Kiezenberg 4 jaar geleden
Sovtube - Russian Radio components <sovtubes@gmail.com>
SBM-20U $13
Anode small pin (do not solder !) Cathode as with SBM20
pascalm 4 jaar geleden
13,9$ + 5,5$ shipping
Will Kiezenberg 4 jaar geleden
SBM-20 is tempory sold out.
pascalm 4 jaar geleden
pascalm 4 jaar geleden
only in bigger quantities per order there (10 pieces)
Axiris 4 jaar geleden
tuecok 5 jaar geleden
04 05 01 00 01 if S1 is pressed. 05 04 00 01 00 after release S1. There's no reaction on pressing S2 and S3.
Any idea, to help me ?
Second topic: How to implement any new I2C device ? A little description to implement additional sensors would be helpful...
tuecok 5 jaar geleden
are working now.
tuecok 5 jaar geleden
and it only works with the WROOM-model ! So I come back with the final result.
Axiris 5 jaar geleden
At the software level, I can't come up with any reason why S2 and S3 wouldn't work, unless something has changed at a lower level. I/O pins 16 and 17 also serve as Tx and Rx of UART2, which is disabled by default, unless that has changed. Which version of Arduino IDE and esp32 core have you installed? Which version of the ESP32 board are you using?
If you want to add a custom I2C sensor, you would create your own I2C driver module for your sensor, add items to the menu structure, add settings, add routines that publish sensor readings to a server like OpenSenseMap. You can start looking into the source code to grasp the general framework of the program, then add your own data structures and routines.
Good luck!
sixtyfive 5 jaar geleden
I just finished mounting all elements end carefully followed all of the nice assembly manual (except serial settings). I have powered the circuit with a 9V 300mA adapter. But after one hour I see only 00.00 µSv/h. With the "select" button, and "Buzzer & Led On", I can hear the radiation detections and see the led blink. But the Count CPM stay 00000.
Is there some minimum settings to do before mesuring any radiation ? Or where I am wrong ?
Best regards
Dominique
pascalm 4 jaar geleden
sixtyfive 5 jaar geleden
Maksim mr Kudinov 5 jaar geleden
Axiris 5 jaar geleden
https://www.elektormagazine.nl/files/attachment/22489
ekn 5 jaar geleden
The project is fine. Nevertheless it is limited to Beta and Gamma ray. Is it possible to extend it to detection of Alpha ray ?
Thanks
JakkeTet 5 jaar geleden
These large area diodes have a quite big capacity, nevertheless I used the 2011 Elektuur preamp and got nice results. The advantage of these diodes is that they are "bare" chips with only a tiny passivation layer and α's have no problem "pushing through". It may not be the ideal solution for α's compared to eg. scintillators but it works.
Made some contribution to the Elektuur-blog at that time but some of the blokes@elektor decided to wipe these "old" blogs, a shame!!!
Jacques.
Axiris 5 jaar geleden
You can connect up to two G-M tubes if they can work at the same anode voltage. As such you can combine a metal wall tube for detecting beta and gamma radiation and a pancake tube for alpha radiation. Please note that the pancake tube will also detect beta and gamma radiation.
In case of a radioactive cloud, the concentration in air of radionuclides will still be low as the cloud tends to disperse itself quickly with increasing distance from the source. G-M tubes alone are not sensitive enough to detect this kind of radioactive contamination reliably. In a CPAM, the air is sucked through a filter with a constant rate, effectively trapping (radioactive) particulate matter into the filter material. As such, radioactive particles are concentrated in the filter material and are easier to detect. Usually the detector is a G-M tube or some kind of scintillation detector allowing for simple single channel gamma spectroscopy. In case you want to detect alpha radiation you should take into account that naturally occuring radon gas is also an alpha emitter and may interfere with your measurements. In order to compensate for alpha radiation emitted by the radon gas you will need specialised and expensive detectors, for example: https://www.ortec-online.com/products/radiation-detectors/silicon-charged-particle-radiation-detectors/si-charged-particle-radiation-detectors-for-alpha-spectroscopy
As these detectors tend to be prohibitively expensive, they fall outside the scope of this project. G-M tubes have their limitations but they are at least affordable.
Kind regards,
Ilse
ekn 5 jaar geleden
Thanks a lot for those explaination. You are right but in case of radioactive cloud many alpha isostope elements are airborned. I think that 2 differents monitors are needed because of 2 differents fonctions.
Many thanks for your detector.
Best regards.
Patrick
Axiris 5 jaar geleden
You can connect other types of G-M tubes if you wish. Currently we are testing with the 78017 and 71217 from LND inc (see photos). If you would like to be able to detect alpha radiation too you can choose a G-M tube with a mica window or a pancake tube.
Please note that for for environmental radiation monitoring, only gamma radiation is of concern as alpha and beta radiation do not travel very far in air. Please note also that G-M tubes for detecting alpha radiation may be less sensitive to gamma radiation. For airborne particulate radioactivity monitoring, a geiger counter is less suitable. In that case you will need a CPAM. More information: https://en.wikipedia.org/wiki/Airborne_particulate_radioactivity_monitoring
Kind regards,
Ilse
Bogdan-Mircea Bodnarescu 5 jaar geleden
dcrunkilton 5 jaar geleden
Benjamin Hall 5 jaar geleden
thanks much,
Ben
Benjamin Hall 5 jaar geleden
thanks
ben
Axiris 5 jaar geleden